

Configuring Your Word-Processing Software
As you prepare to sculpt your writing masterpiece in APA style, take time to configure the settings on your word-processing software program, Microsoft Word, bundled in Microsoft Office. Watch the tutorial to learn how to configure your word processor (courtesy of Regent University's Student Services). This tutorial requires the Adobe Shockwave Player. The Shockwave Player is free, easy to get, and available to everyone on the Web. Download the latest version of the Shockwave Player if you do not already have it.
|
Tip: Throughout this learning unit, you will find markings such as "(5.04)." Each of these marks the specific location of a given topic in the APA manual. |
Microsoft Word Settings for APA Writing
Whether you watch the tutorial linked above or not, you may find it helpful to read the steps below. Take time now to configure your word processor.
APA Survival Settings:
- Set your page margins to 1 inch on all sides. (However, if you are preparing a document for binding, e.g., a thesis or dissertation, you should plan to leave a 1.25 inch margin on the left side of your page.) (8.03)
- In choosing a page text setting for APA, do not choose right hand or full justification of text; only left hand justification is acceptable.
- Select Insert > Header from your word-processing menu bar and create a defined header for your APA paper. You will have to select an abbreviated title to become part of the header; some professors prefer students to use surnames as part of their header. Also use a properly formatted running head. (8.03).
|
TIP: Start on the second page first and create the right-justified Header the way you want it to show on all subsequent pages. Make sure you check the "Different first page" box. Then go to the title page and create the same header with tabs separating the running head (p. 230) so that the running head looks left-justified. They should both be on the same line. See example later in this lesson. |
- Part of your Header selection is page numbers. APA requires pagination on every page including the title page. This goes with the header right-justified in the upper right hand corner of the page with five spaces between the word and the page number. Page numbers are carried but not printed on every page. Your word-processing software will print the header and consecutive pagination automatically for you.
- Not all typefaces are acceptable in APA, only Times New Roman. (8.03)
- Type sizes also make a difference in APA. Choose 12 pt. font. (8.03)
- Another word-processing configuration is to set the indent function to five or seven places. A five-space indent is the most common preference. (8.03) Use the Word Processor ruler bar "View > Ruler" to set your tabs and indents. Do NOT use manual spaces for your paragraph indents.
- APA requires double spacing for the entire paper -- everything. One may choose to set the word-processing line choice to double-spacing when you begin the paper or one may choose to single space the entire document during writing and by then highlighting the entire text later, choose double spacing of lines (8.03). Do NOT put manual line breaks at the end of the lines at whim to double-space the lines.
- Spacing and Punctuation is found at (4.01 - 4.07). Use "Edit > Replace" to find all double spaces and replace with single spaces. In the top bar type a period with two spaces and in the bottom bar type a period with one space. Then click on Replace All. Keep doing that until it cannot find any more errors to replace.
APA Optional Settings with Potential for Making Your Life Easier:
Set your Microsoft Word spelling and grammar toolbar settings to improve your writing. Below are the ones I find most useful for the APA writing style. Hope you find this helpful too. Spelling errors will have faint red underlines; grammar errors will have faint green underlines.
To access the settings below in Microsoft Word 2003, navigate to: Tools > Options > Spelling & Grammar.
To access the settings below in Word 2007, click the Windows "pearl" button on the top left corner. Click on "Word Options" at the bottom, then select the "Proofing" tab on the left.
To access the settings below in Word 2010, click the file button on the top left corner of Word. Click on "Options" at the bottom of that menu, then select the "Proofing" tab on the left. The following directions are pertinant to Word 2010 but can be adapted to any previous version of Microsoft Word.
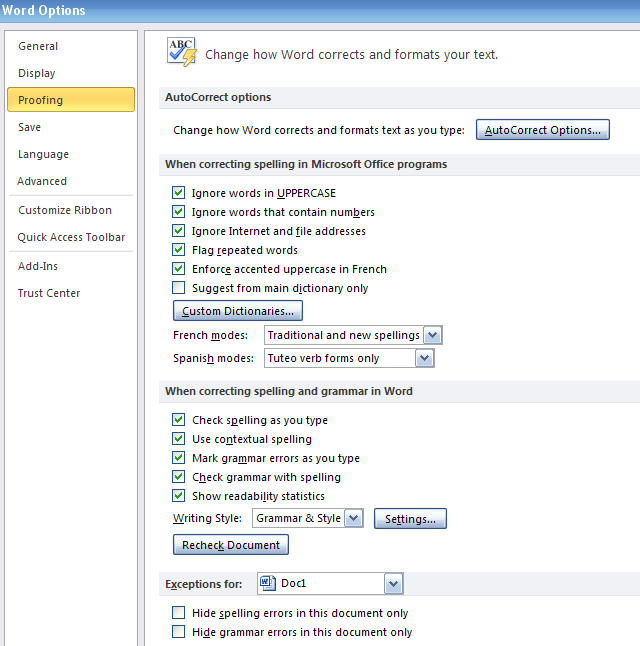
Once you are in the menu, apply the settings above.
